
It’s the first time I’ve experimented with adding Derwent colour pencil to my pyrography drawings and for this project, I decided to experiment with Derwent Coloursoft pencils to create a piece featuring two orangutans embracing.
Here’s how it was made:

To ensure I get the super smooth drawing surface I’m looking for, I first sand the wood then lightly spray it with water, allow to dry and repeat.
Doing this raises the grain of the wood and means that when the final finish is added (varnish for example), the grain has already risen and been sanded back so there will be no unwanted “rising” effects.
With the wood now prepped and sanded, I draw a rough outline of the image onto the wood.
Marking the most prominent features when drawing the outline helps me to keep everything in proportion and hopefully in the right place as I navigate my way around the drawing.

Finally, it’s time to start burning! The process is almost the same as drawing in pencil – by this I mean it still shares the same principles of shading and I still have to be thoughtful of line direction – maybe even more so as there’s no using an eraser when burning onto wood!
Here’s how it evolves up to the point where I’m ready to add the colour with Derwent’s Coloursoft pencils.


Now, at this this stage I was pretty happy with the final pyro piece but I wasn’t finished yet!
This was always going to be my first attempt at introducing colour to my pyrography and although I’ve been drawing for a couple of decades now and have total faith in the capabilities of Derwent’s pencils, sometimes my enthusiasm doesn’t always match what I have in mind!
But, just as always, I wasn’t disappointed with the ease of which the pencils took to the surface. The fine lines burned into the wood had created tiny grooves – much the same as if I had used an embossing tool!
The versatility of these pencils with their softness, yet ability to still hold a point, allowed me to draw as if on paper. Blending where needed, filling the “embossed” lines made by the pyrography tool or lightly layering around them.
Firstly, I apply the colour quite blocky and as more of base colour to tone down…

Now I need to bring it down a level. I was quite surprised how vibrantly these colours showed on top of the sepia colours of the burned image on the wood!

Now, those vibrant colours are looking a little more blended, I just want to add in some very slight highlights and I believe my first project with pyrography and Coloursoft pencils has been a success!
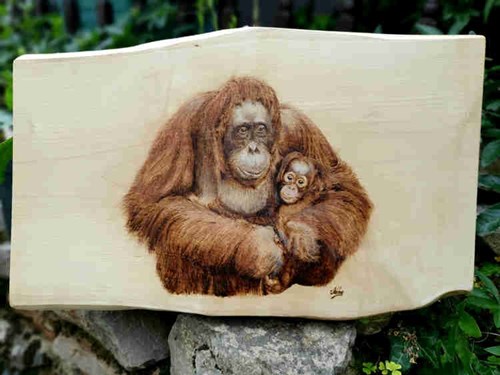
Here it is. Titled “Embrace” – measuring 20″ x 12″.
Drawn using a pyrography kit and finished with Derwent Coloursoft Pencils.
Thank you to Samantha Norbury for providing us with this blog. Discover more of Samantha’s work on her website, Facebook and Instagram.